
Charger Onboarding using Pairing Code issued by Jedlix
Charger Pairing using Code issued by the Smart Charging Service Provider
This guide describes the scenario where the end user onboards the charging station to the smart charging service by entering an pairing code into the CPO's User Interface. This code is provided by the Smart Charging Service Provider.
Customer Journey
- The user initiates the charger pairing process in the app
The journey starts in when the user navigates to the charger pairing section within the App. When the user opens this screen, the App generates a unique activation code which is then prominently displayed in the User Interface for the user to note.
- The user enters the the Pairing Code in CPO's UI
With the activation code at hand, the user then transitions to the Charge Point Operator's platform.
Here, within the charger settings, the user can initiate the pairing process, and is prompted to input the activation code as showcased in the SCSP's app.
Once successful, the user sees a confirmation that the pairing process has succeeded and from that moment onwards, charger data will be transmitted to the Jedlix App.
- The user sees that the charger is successfully paired in the app
The Jedlix app confirms that the charger is added to the charging location and can be used for smart charging.
Finally the dashboard in the app shows a status that indicates that the app is waiting for a session to take place on the charger.
- The user unpairs the charger
if the user decides to stop the service they can navigate to either the App or CPO interface.
Technical Details
Sequence diagram
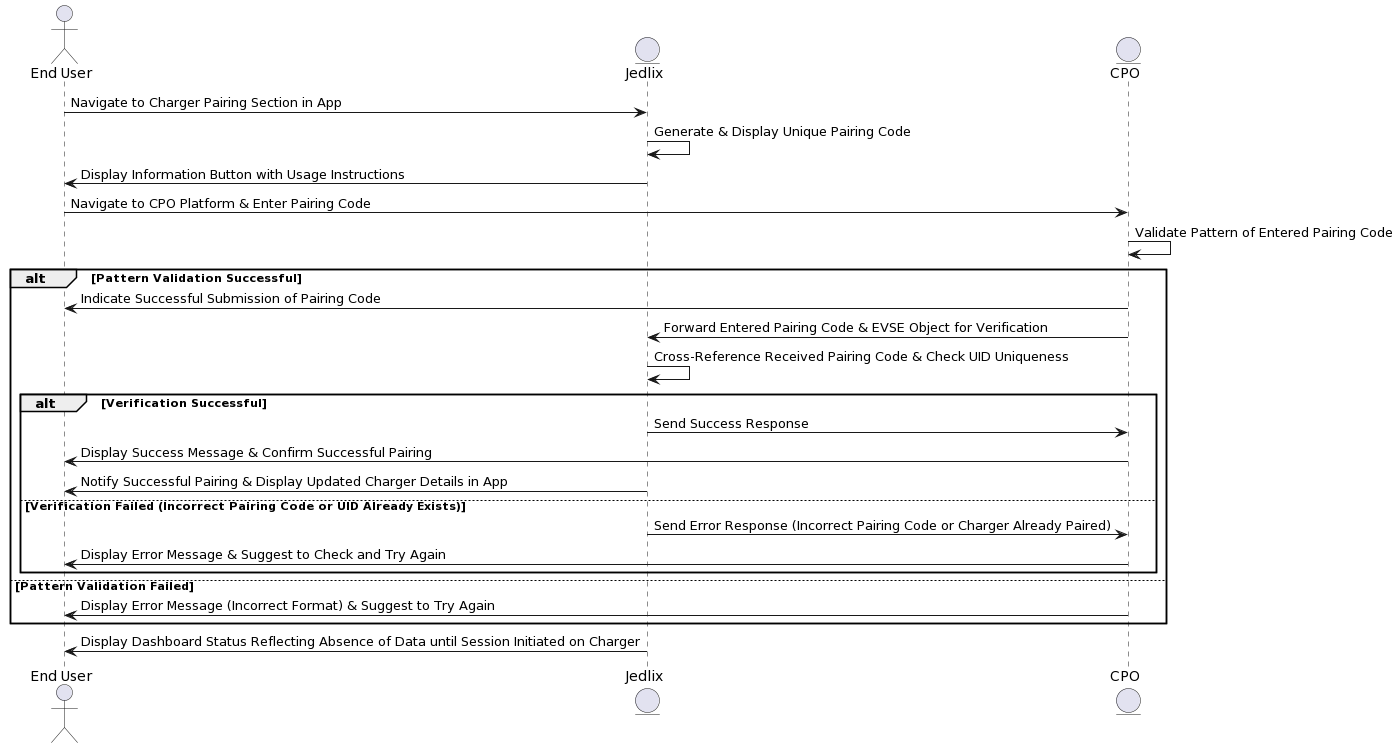
Step 1: User Initiates the Charger Pairing Process in the App
- The user accesses a specialized section in the app to begin the charger pairing process.
- A unique Pairing Code is generated and displayed prominently to the user as soon as they navigate to this section.
- An information button is available to guide the user on how to utilize the Pairing Code.
- The code will expire after a reasonable period of inactivity by the user
- The user can request a new code if needed
Step 2: User Enters the Pairing Code in CPO's UI
- The user transitions to the CPO platform and enters the provided Pairing Code in the specified field within the CPO’s user interface.
- The CPO’s user interface validates the pattern (REGEX) of the entered Pairing Code and provides immediate feedback to the user:
- If successful, it indicates that the Pairing Code has been accurately entered and submitted.
- If unsuccessful, an error message is displayed, specifying the incorrect format and suggesting the user try again.
Step 3: Pairing in Progress
- Subsequently, the CPO platform forwards the entered Pairing Code and the corresponding EVSE object to Jedlix for verification.
- Jedlix receives the Pairing Code and the EVSE object and conducts the following verifications:
- Cross-references the received Pairing Code with the list of valid Pairing Codes to confirm the pairing.
- Checks the
uidin the EVSE object to ensure it doesn’t already exist within the Jedlix platform.
- Depending on Jedlix’s synchronous response:
- A success message is displayed on the CPO’s user interface, confirming successful pairing.
- An error message is displayed on the CPO’s user interface if the Pairing Code is incorrect, advising the user to verify and try again.
- An error message is displayed on the CPO’s user interface if the charger is already paired to another account, informing the user of the existing pairing.
Example of the exchange between CPO and Jedlix
- Request from CPO to Jedlix to Verify Activation Code and EVSE Object
POST /v1/scsp/pair
Content-Type: application/json
Authorization: Bearer <Your_Auth_Token>

{
  "code": "362821",
  "evse": {
    "uid": "3256",
    "evse_id": "BE*BEC*E041503001",
    "capabilities": ["CHARGING_PROFILE_CAPABLE"],
    "connectors": [
      {
        "id": "1",
        "power_type": "AC_3_PHASE",
        "max_voltage": 220,
        "max_amperage": 16
      },
      {
        "id": "2",
        "power_type": "AC_3_PHASE",
        "max_voltage": 220,
        "max_amperage": 16
      }
    ]
  }
}
- Response from Jedlix to CPO on Successful Verification
200 OK- Response from Jedlix to CPO on Failed Verification due to Incorrect or Expired Activation Code
404 Not Found
{
  "message": "Incorrect or Expired Code, please check the code and try again.",
}- Response from Jedlix to CPO on Failed Verification due to UID Already Exists
409 Conflict
{
  "message": "This charger is already paired to another account.",
}
Step 4: Processing of Charging Station details
- If the Pairing Code is processed successfully and the received EVSE object has a unique
**EVSE uid**, the charger details are recorded in the charging location
Step 5: Post Pairing Confirmation
- The user is notified in the app that the pairing has been successful.
- The dashboard displays a status reflecting the absence of data until a session is initiated on the charger, keeping the user informed of the current status of the charger.
Step 6: Un-pairing
If a user decides to:
- Unpair the charger via the SCSP or CPO interface
- Deletes their CPO or SCSP account
The Smart Charging Service Provider communicates with the Charge Point Operator (CPO) to unpair the ChargingStation. As a result of this action:
- The forwarding of charger data to the Smart Charging Service Provider is stopped.
- Any charging profiles dispatched by the Smart Charging Service Provider for this ChargingStation are subsequently declined.
Example
-
Request to unpair the charger
-
Initiated by the SCSP:
POST /v1/cpo/unpair Content-Type: application/json { "evse_uid": "6502dd967c6c0071804a7108" } -
Initiated by the CPO:
POST /v1/scsp/unpair
Content-Type: application/json

{
  "evse_uid": "6502dd967c6c0071804a7108"
}
-
-
Response when Un-pairing is Successful:
200 OK { "message": "Charger successfully unpaired." } -
Response when Un-pairing is Successful (e.g., Invalid ID):